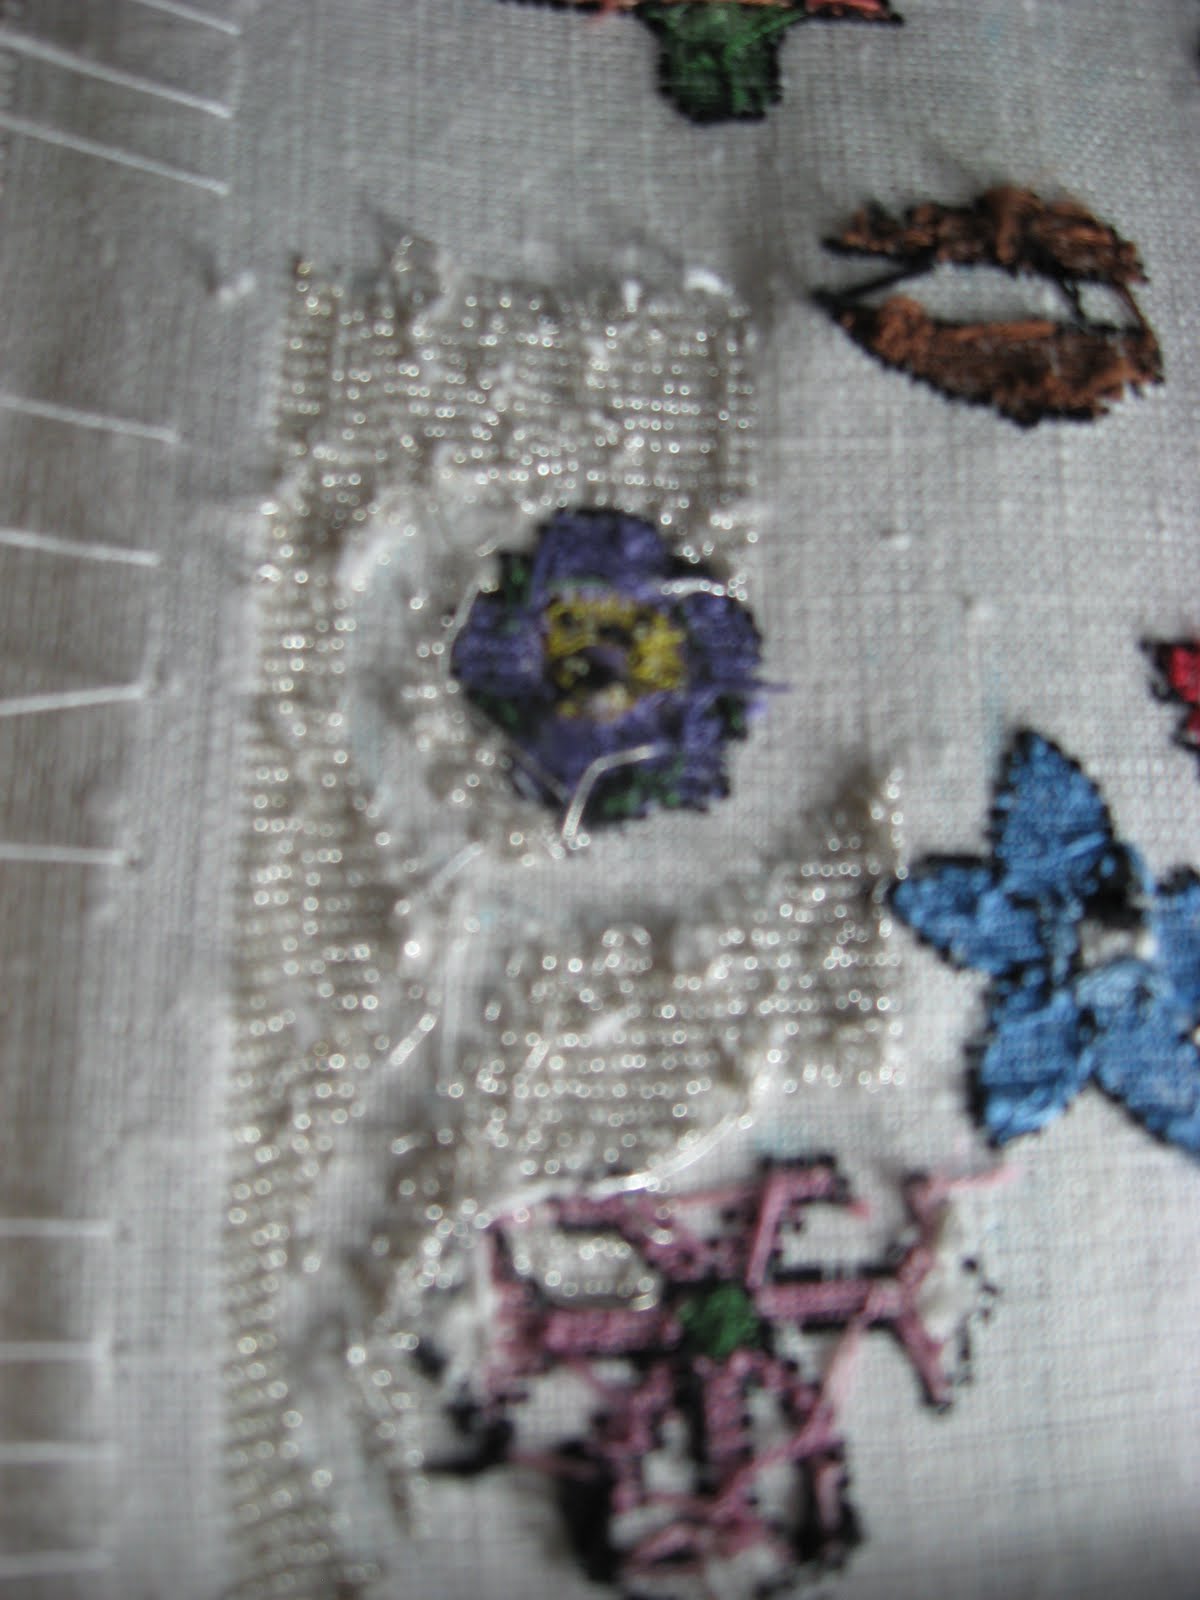
Working with metal threads has been an interesting experience. They are quite finicky. I'm using No. 4 silver passing thread for the ground of my bag, done in an "Elizabethan Ground Stitch", as advocated by Jacqueline Carey, in her Sweet Bag Book. She points out that this is the most common stitch on the bags she has observed, and, indeed, there is a clear difference in the amount of metal thread visible on a side, so it makes sense that this stitch would be used, as it would allow for the least amount of "hidden" expensive metal thread.
Right side:
Wrong side:
I'm working with a brass needle, made by my husband. This has a punched eye, which is much kinder on the metal thread than the stamped eye of a commercial needle. (The steel needle sticking under the threads is used when I need to fix a mistake and pull out metal threads, rather than bend my brass needles).
The ground stitch is very soothing to the eye, although mistakes are obvious. It's worked 1:4, and then loops behind for 2, similar to a stem stitch.
Tuesday, April 5, 2011
Side Two!
For side two, I decided to use the darker red thread on the rose. I'm not totally happy with it- I might have preferred sticking with the "rosier" colors on side one. I also did the pink in shades of peach, which I do like. I also added a small hillock at the bottom of each side, for my plaited braid to "root" into. After examining some extant pieces in person at the Met, I might have made the hillock in shades of green, but I don't think it looks terrible. I suppose I could pull everything out, but that petit point is TINY, and I can always experiment on my next one. ;)
Monday, March 14, 2011
Side one
I completed the colored embroidery on the first side of the sweet bag. I now know why the sides on extant bags tend to vary from each other- without counting, it's impossible to make things exact, plus, I may alter the shading on the second side, and some colors. Artistically, I'm mostly pleased, although I don't feel the rose is a vibrant, so I will switch with the red in the pink. I will also extend out the yellow in the center of the viola, for more effect, and maybe add a lighter shade of purple for more contrast (I do have two colors of purple in there now, but they're very similar). I used floss that I had available, so some of the colors aren't as exactly precise as I might have wanted them- but it is a good experience in working with what I have, rather than unlimited colors. This seems to me more like what would happen "in period"- color choices would be more limited than what we have today.
I may add some more motifs, because extant bags seem "busier"- but my goal end size for this one is approximately 4.5 inches square, so I want to make sure I have room for the plaited braid. I'll probably draw those lines in, and then see how much room remains. I'm also stuck on what the center base motif will be. I've seen butterflies, rabbits, birds, leaves...but I haven't found one I love.
I'm using a 32-count canvas, and doing tent stitch 1:1, which makes it a petit point, and it is BRUTAL. It is so tiny, and so time-consuming! I love the overall look, but still...
Thursday, March 10, 2011
Teaching at Pennsic!
I have signed up to teach two classes at Pennsic XL this year:
1. 16th Century English Monochrome Embroidery- aka "Blackwork". This class will cover extant examples as well as techniques and characteristics that identify this art form. We will practice commonly used stitches and fills.
2. Late 16th Century English Polychrome Embroidery. We will look at extant examples, including coifs and jackets, and identify common techniques and characteristics. We may practice detached buttonhole and plaited braid stitch if desired.
Each class will be an hour long, and I requested they NOT be the same day as the A&S display, as I plan on exhibiting. I did request the 9AM- Noon spot, but we will see.
Hope to see you there!
1. 16th Century English Monochrome Embroidery- aka "Blackwork". This class will cover extant examples as well as techniques and characteristics that identify this art form. We will practice commonly used stitches and fills.
2. Late 16th Century English Polychrome Embroidery. We will look at extant examples, including coifs and jackets, and identify common techniques and characteristics. We may practice detached buttonhole and plaited braid stitch if desired.
Each class will be an hour long, and I requested they NOT be the same day as the A&S display, as I plan on exhibiting. I did request the 9AM- Noon spot, but we will see.
Hope to see you there!
Tuesday, March 8, 2011
Sweet Bag!
So, my copy of the book arrived. It's helpful, especially the finishing details at the end, describing the drawstring and tassel construction. Jacqui Carey does a nice job of describing the pieces she's looking at, but I would have liked more explanation for some of her conclusions, particularly when they conflict with "accepted" scholarship. Also, I think some of the embroidery diagrams are a bit confusing, especially when it doesn't illustrate how to start the stitch.
I decided to go with a 5 flower motif- one in each corner, and one in the center. This is found on extant sweet bags, as are the flowers I've chosen. I'm using two strands of silk floss, and the flowers are outlined and will be filled in using tent stitch. I drew the design freehand from period images, and transferred it to the fabric using a lightbox.
The same image is repeated on both sides- there is a fold on the bottom, and the sides are stitched together, so right now the top and bottom halves are opposites. I used a water-soluble pen to transfer my design, so I could alter it if I was unhappy with the placement of the motifs. In period, the design would have been inked onto the fabric.
The flowers are honeysuckle, rose, borage, pansy (viola), and a carnation (pink, gilliflower). I plan to do the borage, gilliflower, and pansy in blue and purple shades, and the rose and honeysuckle in pinks and roses.
I decided to go with a 5 flower motif- one in each corner, and one in the center. This is found on extant sweet bags, as are the flowers I've chosen. I'm using two strands of silk floss, and the flowers are outlined and will be filled in using tent stitch. I drew the design freehand from period images, and transferred it to the fabric using a lightbox.
The same image is repeated on both sides- there is a fold on the bottom, and the sides are stitched together, so right now the top and bottom halves are opposites. I used a water-soluble pen to transfer my design, so I could alter it if I was unhappy with the placement of the motifs. In period, the design would have been inked onto the fabric.
The flowers are honeysuckle, rose, borage, pansy (viola), and a carnation (pink, gilliflower). I plan to do the borage, gilliflower, and pansy in blue and purple shades, and the rose and honeysuckle in pinks and roses.
Sunday, February 20, 2011
Spiderweb 2.0
I was very unhappy with the first version of the spider web, so I re-visited it. Based on observations from my apprentice sister, Lady Mairghread Ghear, I did indeed length the spokes, and use more couching stitches to create a more bowed line between the spokes. I'm much happier with this version:
Now I just need to decide if I'm adding anything else to the embroidery. The original examples have some satin stitch leaves, so I may add those, or just leave it as it is, although it does look like Halloween.
***
In other news, I'm also investigating period applique. The extant 16th century examples are mostly couched on, either cut fabric or cut needlework slips. I did receive my copy of Digby's Elizabethan Embroidery, so I need to read through that, as well as the Levey's catalog of the Hardwick Hall embroideries, and possibly the Bard exhibit. I'm excited about it this, which surprises me, because I never thought applique was all that exciting. But considering there are many 16th century English hangings and furnishing which use these techniques, it looks like I might really be able to make some beautiful things.
The sweet bag remains the top priority, as soon as Customs lets my book through.
Now I just need to decide if I'm adding anything else to the embroidery. The original examples have some satin stitch leaves, so I may add those, or just leave it as it is, although it does look like Halloween.
***
In other news, I'm also investigating period applique. The extant 16th century examples are mostly couched on, either cut fabric or cut needlework slips. I did receive my copy of Digby's Elizabethan Embroidery, so I need to read through that, as well as the Levey's catalog of the Hardwick Hall embroideries, and possibly the Bard exhibit. I'm excited about it this, which surprises me, because I never thought applique was all that exciting. But considering there are many 16th century English hangings and furnishing which use these techniques, it looks like I might really be able to make some beautiful things.
The sweet bag remains the top priority, as soon as Customs lets my book through.
Couching
I also decided to give couching a try. I was inspired by seeing a detail of this image in Queen Elizabeth's Wardrobe Unlock'd
In color, the tree is obviously done with metallic threads, but in the black and white image in the book, it's also obvious that the tree is couched down. I decided to do everything with couching, and this is the result:
I decided to do the whole thing with couching, even though the original seems to incorporate padding or stumpwork. I especially enjoyed couching the spiral of the spider's body. I'm disappointed how the spider web turned out- I need to pull that out and try again, and re-examine my inspiration pic. I think I didn't make the spokes of the web long enough, but I might also need to fuss with the couching, to get the more rounded feel of the web in between the spokes.
I have not yet decided what to make with this, perhaps some sort of small bag or purse, maybe to carry some sewing supplies.
This is done using silk thread on a wool flannel base.
In color, the tree is obviously done with metallic threads, but in the black and white image in the book, it's also obvious that the tree is couched down. I decided to do everything with couching, and this is the result:
I decided to do the whole thing with couching, even though the original seems to incorporate padding or stumpwork. I especially enjoyed couching the spiral of the spider's body. I'm disappointed how the spider web turned out- I need to pull that out and try again, and re-examine my inspiration pic. I think I didn't make the spokes of the web long enough, but I might also need to fuss with the couching, to get the more rounded feel of the web in between the spokes.
I have not yet decided what to make with this, perhaps some sort of small bag or purse, maybe to carry some sewing supplies.
This is done using silk thread on a wool flannel base.
Owl
Since I'm still waiting for my Sweet Bag book to come in, I figured I would use this time to do some more embroidery, perhaps trying some new things. I decided to try and pick up some more competencies for Athena's Thimble, the East Kingdom Needleworkers Guild. The list of categories is found here. I already have a competency in Counted Work, and Period Competencies in Canvaswork and Blackwork.
So I decided to finish a needlebook I started last summer, which features the emblem of the Guild. Here's the finished embroidery:
It's silk floss on silk-satin; I used chain, split and satin stitches. I'm pretty happy with the way he came out- he has a bit of personality, and I like that. I do think that free embroidery is not my favorite, or my strong point, but I need to expand my repertoire of stitches and skills, so that's always a good thing to try something new.
So I decided to finish a needlebook I started last summer, which features the emblem of the Guild. Here's the finished embroidery:
It's silk floss on silk-satin; I used chain, split and satin stitches. I'm pretty happy with the way he came out- he has a bit of personality, and I like that. I do think that free embroidery is not my favorite, or my strong point, but I need to expand my repertoire of stitches and skills, so that's always a good thing to try something new.
Wednesday, February 9, 2011
Sweet Bag Research
Whenever I begin a new project, the first thing I like to do is read and see as much as possible about the project. I use my grad student access and librarian skills to find as many images of extant items online as I can, and I try to find as many books and academic articles as possible.
My recent interest in sweet bags has led me to examine the images in ARTstor. Of particular interest were two sweet bags housed in the Cleveland Museum of Art. The WONDERFUL thing about these images is that they are, indeed, the FRONT and BACK of each sweet bag. A double check of the accession numbers and a careful examination of high resolution photos indicates that the same accession number is used on two different images, indicating a back and a front. (And before one suggests it's just two photos of one side, there are subtle differences between the sides to indicate the difference).
The items are 1944.283 and 1946.416 . On 1944.283 the difference is easier to see: one side goes "flower, bird, flower" and the other was create "bird, flower, bird". 1946.416 is very similar on both sides, but the color of the pansy in the center bottom changes from image to image- including the very center of the flower, being yellow in one image and rose on the other.
At least on these two items, both sides were embroidered to be similar, although 2 is hardly a representative sample number.
So now I know when planning that it is plausible to create to similar, and yet different sides to my bag, and also that there is evidence of embroidery on both sides of bags.
My recent interest in sweet bags has led me to examine the images in ARTstor. Of particular interest were two sweet bags housed in the Cleveland Museum of Art. The WONDERFUL thing about these images is that they are, indeed, the FRONT and BACK of each sweet bag. A double check of the accession numbers and a careful examination of high resolution photos indicates that the same accession number is used on two different images, indicating a back and a front. (And before one suggests it's just two photos of one side, there are subtle differences between the sides to indicate the difference).
The items are 1944.283 and 1946.416 . On 1944.283 the difference is easier to see: one side goes "flower, bird, flower" and the other was create "bird, flower, bird". 1946.416 is very similar on both sides, but the color of the pansy in the center bottom changes from image to image- including the very center of the flower, being yellow in one image and rose on the other.
At least on these two items, both sides were embroidered to be similar, although 2 is hardly a representative sample number.
So now I know when planning that it is plausible to create to similar, and yet different sides to my bag, and also that there is evidence of embroidery on both sides of bags.
Friday, February 4, 2011
Progress
The sweet bag project has been slow going. I needed to order metal thread supplies, and then I found a book, Sweet Bags by Jacqui Carey, so now I don't want to start until it arrives.
But I decided to try some new stitches. Obviously, gobelin for the ground, but I'd really love to add some plaited braid. I'd also like to get detached buttonhole down.
So while home sick, I practiced detached buttonhole. It continues to elude me. I just can't get an even tension. Either I pull too tight, and make needlelace, or it's too loopy and just looks sloppy.
But I did try some plaited braid, using this youtube video: Video.
And here are the initial attempts:
I tried a variety of threads, and finally thought of using upholstery thread, as I hoped it might mimic the weight and stiffness of metal thread for practice. I'm pretty pleased with myself, although the pic is a bit blurry.
But I decided to try some new stitches. Obviously, gobelin for the ground, but I'd really love to add some plaited braid. I'd also like to get detached buttonhole down.
So while home sick, I practiced detached buttonhole. It continues to elude me. I just can't get an even tension. Either I pull too tight, and make needlelace, or it's too loopy and just looks sloppy.
But I did try some plaited braid, using this youtube video: Video.
And here are the initial attempts:
I tried a variety of threads, and finally thought of using upholstery thread, as I hoped it might mimic the weight and stiffness of metal thread for practice. I'm pretty pleased with myself, although the pic is a bit blurry.
Subscribe to:
Posts (Atom)